About the Chef

My photo
Oregon, United States
My name is Alexia. I have lived in NE Oregon for most of my life, and love it here because it's where my family is. I have 3 younger sisters, 3 younger brothers, and a million cousins. I live with my husband and our three boys, and our dog Norman. My family is Greek/ Cajun/ Mexican, so food is very important to us;-) I love cooking and creating new recipes, my kids, my family, wine, painting, and everything retro! I am a dialysis technician. I love my job and my patients. I am currently studying to be a nurse. I love school, and so far it has been good to me... Dean's List or Honor Roll each term! Between work, school, my husband, our kids and all of their activities and adventures, I don't have a ton of time to blog. I love sharing recipes, so I make time for it when I can. You can follow me on Pinterest for more ideas and inspiration (thanks to those of you that have pinned my recipes!): pinterest.com/lexisamom .

Sunday, July 24, 2016

Understanding pH Levels: How it Effects Canning

I love chemistry so this is one of my favorite lessons for new canners.

Currant jelly, pickle chips, and pickle spears all processed 
in a waterbath canner

If you have had any experience canning, you have probably read or heard something about pH or acid levels in relation to safe canning methods. Or, you have at least probably heard that some items are not safe to can in a boiling waterbath. This post breaks down why. 
When you preserve something in a waterbath canner, you heat the jars and their contents to the boiling point (that temperature varies depending on your elevation, but at sea level the boiling point is 212 degrees F). That heat is enough to kill the micro-organisms that can cause spoilage, mold, or fermentation, but it’s not enough to kill botulism spores (they require far higher temperatures). The process of boiling the jars also helps to drive the oxygen out of the jars, creating a vacuum seal. For jars that have sufficient acid content, the result is a jar of food that is safely preserved and shelf stable.
If a food is 4.6 pH or lower, it can be safely canned using a waterbath method. It it is 4.7 or above, it is considered too alkaline to waterbath process and must be processed using a pressure canner method. 
If a food is very close to the 4.6 pH range, you can often add acid to make it safe. For example, adding vinegar or bottled lemon juice can bring a pH down. Tomatoes are usually right around 4.6 pH, so when I can them in a waterbath, I add bottled lemon juice. NOTE: It is important to use bottled lemon juice rather than juice from fresh lemons because the pH is monitored and guaranteed in manufactured juice, whereas fresh lemons vary in pH. It is the same with lime juice. Vinegar used for canning is usually labeled as either "safe to can" or has at least 5% acidity. 
Some foods are naturally acidic, such as peaches, or are made acidic by the recipe, such as pickles. Almost anything pickled is safe to can using a waterbath because of the vinegar brine. Most fruits, jams, and jellies can also be safely canned using a waterbath method. 
When in doubt, you can always use a pH meter. Keep in mind you are measuring the contents of the entire jar and not just one ingredient. For example, if you know tomatoes are 4.4 pH, but you add onions, peppers, and spices, then you have raised the pH and you should either balance it with lemon juice or acid, or pressure can to be safe. 

Waterbath Canning vs. Pressure Canning

There is a difference in waterbath canning and pressure canning.

Waterbath canning involves a process where you place your hot jars in a big pot of boiling water. The water has to cover the jars completely and boil during the process time. A Pressure canner is a large pot with only a couple inches of water in the bottom. The lid screws or bolts on, there is a pressure gauge, a steam valve, and other safety mechanisms to avoid excess pressure. The pressure from the heat on the stove will cook the food. Waterbath canners have the ability to heat jars to 212 degrees, that of boiling water. Pressure canners get much hotter, and can kill harmful spores. Before canning, read my blog post on acid and pH levels and how it determines which process to use.

Everything can be safely processed in a pressure canner, but not everything can be safely processed in a waterbath. When in doubt, pressure can.

I always get asked, "Then why would everyone pressure can all the time?" There are several reasons:

1. Purchasing a waterbath is fairly inexpensive, whereas pressure canners are spendy. I have a Graniteware Waterbath  from bi mart that I have used for several years that was about $11. My Presto Pressure Canner was about $100.

2. Waterbaths are low maintenance. They last forever. With pressure canners, it is important to check the gauges and seal often, and sometimes those components need replaced. It's not expensive, but waterbaths are good to go for about 150 years.

3. Pressure canning can be scary for people who have never done it. Everyone has seen those disaster photos and read the stories on the internet about explosions and people getting burned, etc. Waterbath canning is the same as boiling water, and poses much less risk. People tend to be less intimidated by waterbath canners.

4. When people start out canning, typically they are canning easy foods, like whole fruit, jam, or salsa. All of these things can be done in a waterbath, so that's where most people start. It's hard to switch to something more difficult for some.

However, there are pros to pressure canning:

1. Everything is done much quicker. Something a waterbath would take 45 minutes to do, a pressure canner can finish in 10.

2. You can double stack easier in a pressure canner. Although you can do it with a waterbath too, it gets difficult to measure the water to the right height, etc. While pressure canning I can get two batches done at once.

3. Using my pressure canner doesn't require boiling a huge pot of water, so my house is not hot and sauna like (canning season is smack dab in the middle of summer).

I prefer pressure canning usually, but sometimes I break out my waterbath to do some items, like pickles (pressure canning is too hot and causes them to be mushy).

Always follow the instructions on the recipe you are using. If it says use a pressure canner, use one. If it says waterbath, you can usually substitute pressure processing without problems. Make sure each recipe is from a credible source and is tested. 

Canning Basics

Each year during canning season I have so many requests from my friends to either teach them to can or to make a video (haha... no) on how to can. I can almost everything- jams, jellies, fruits, tomatoes and salsa, pasta sauce, tuna, and vegetables- and I have been canning pretty much my whole life. I think I have made every mistake there is to make, seen every disaster that could happen, and have had to throw out whole batches because of "mess ups". Canning is not difficult, but has to be done properly and per guidelines to keep it safe.

This blog post is just the basics for beginners to learn what to do and not to do when canning. If you follow the basic rules, you'll have great outcomes each time. 

1. There is a difference between waterbath canning and pressure canning. Before canning anything in a waterbath, read my blog post on Waterbath vs. Pressure Canning here

2. Make sure you use new lids each time. Jar rings can be reused over and over again until they are rusty or bent, but new lids must be used or a proper seal wil not form. 

3. Prior to sealing any food, you should sterilize your jars by running them through the dishwasher. If you don't have a dishwasher, wash them in hot, soapy water and rinse with hot water. 

4. Lids and rings should also be sterilized. You cannot put lids in the dishwasher. I clean mine by boiling them for 2 minutes. 

5. "Headspace" means the space on the top of the jar between the product and the lid. Recipes will specify a headspace. Pay close attention and follow the instructions. Leaving too little headspace can prevent sealing or cause product to "escape" or leak out during processing. 

6. Learn to adjust for elevation. When using a pressure canner, most recipes will say something like "Process at 10 psi for 10 minutes". The higher your elevation, the higher the pressure must be. The FDA has a handy website with these instructions. 

7. Get a pH meter and use it. It's important to know what the pH is on certain foods to determine whether you can use waterbath processing or not. 

8. When measuring pH, keep in mind that you are measuring all of the contents of a jar. So, if you are canning tomatoes, but you add onions, peppers, and spices, the pH will change from that of just tomatoes. Remember, 4.6 or lower, waterbath is ok. 4.7 or higher, only pressure canning is safe. The FDA has a guideline chart if you need some help. Before canning, please read my post on safe pH levels here

9. Follow the FDA and canning guidelines always.

10. If a recipe uses vinegar or lemon juice, use the specified amount. Do not skimp. Vinegar and lemon juice are used to make jars acidic to kill harmful bacteria and botulism spores. If not prepared correctly, waterbath canning will not kill botulism spores, which can be harmful. 

11. Always label your jars with the name of what it is, the date you canned it, and a batch number. Batch numbers come in handy. If I make two separate batches of dill green beans, both in July 2016, and one batch was too salty or bitter, I know which cans to throw out and which to save. Similarly, if I make one really kick ass batch of salsa, I know why, and I know I can recreate it. Batch numbers rule. 

12. Store jars in cool, dark places. I keep mine in my food pantry. Basements are a popular storage space. Keep out of sunlight, which can heat and brown fruits. My grandmother had some jars in her laundry room, and because of the heat, several seals popped. It was a huge mess to clean and a shame of a waste.

13. Wear an apron. Don't ruin your clothes.

14. Wear clothes toed shoes. Trust me. A hot, heavy jar is not friends with your feet. Ouch. 


Thursday, June 30, 2016

Holy Cow- It's Been too Long!

I got an in blog email from a follower asking if my page was still active.

How embarrassing!

Of course. I have been so busy lately that I have not thought about posting recipes. Now that I've had a kick in the pants from a faithful foodie, I will get back on the horse.

I took a break from writing recipes to go to school. First, it was Phlebotomy and Lab Technology. After that wasn't enough, I did a Dialysis Technician Program (I currently work as a hemodialysis technician). I am now studying to be a nurse. Along the way I have accidentally earned a few random certificates (Medical Office Assistant, etc). I think I may start a collection ;-)

My husband and I made it "official" and after ten years, finally legally tied the knot. Shortly thereafter we bought a house which we are working on to make "our own". We have had it painted, we landscaped, planted some gardens, and we plan on adding a deck and a bedroom. Easier said than done, right?

After buying the house, we gave in and finally got our kids a dog. His name is Norman Bites, and he is the cutest Jack Russell Corgi mix. High maintenance he may be, the boys love him and he loves them.

I have found time to volunteer in my son's classroom and although I'm not coaching this year, the boys are enrolled in summer soccer. Each weeknight we have some sort of soccer event, and we love it.

In all of the chaos of working, school (Dean's List! Whoop!), I am proud that I still find time to make a home cooked dinner each night for my family. Sometimes I don't have time to curl my hair or wear makeup, and I haven't painted my nails in a while. My eyebrows need attention and that "exercise program I was doing- ha. But, my family sits down to a set table and eats a healthy, homemade dinner every single night. And I love it. I wouldn't have it any other way.

Last weekend I overheard my 11 year old stepson tell someone "Lexi is Supermom. She can do everything. It's like the moms on TV." Aww. My heart skipped a beat. He had no idea I could hear him <3 6="" be="" guess="" have="" i="" if="" interjected="" more="" my="" nbsp="" old="" on="" p="" popsicles="" provided="" quickly="" say="" so="" super="" that="" to="" will="" work="" would="" year="">
So, in a long response to one of my favorite blog followers, yes, my blog is active, just not as active as I am. Within the next week or so, I will find the time between Medical Terminology assignments to write down one of the dinners I make and share it with the world.

By the way... 20,000 views. You guys rock! <3 nbsp="" p="">

Saturday, December 13, 2014

Three- Ingredient Vegan Chocolate Squares (gluten free and cane sugar free)

Follow me on Pinterest! Busy Mama Recipes


I had these at my friends house today, and they were so yummy I had to come home and make some. Thank you, Michelle, for the awesome recipe!

They're super easy to make. Although they aren't "healthy" in a low- calorie sense, they are organic and a more whole, natural way to get your chocolate fix. Sweetened with honey, they don't contain any cane sugar.

The end result is like a cross between a thick fudge and the inside of a chocolate truffle. Because they are made with coconut oil, the candies need to be kept chilled so they don't get runny. Although bringing them to room temperature makes them gooey, which is not a bad thing:-)


Ingredients:
1 cup organic coconut oil (I used Wildtree Organic Coconut Oil, which does not have a strong coconut favor)
1 cup organic unsweetened cocoa powder
1/2 cup organic honey

In a mixing bowl, beat the coconut oil and add the cocoa powder slowly (so the powder doesn't get everywhere). Add the honey and mix well. Pour into a small dish with sides- I used an individual casserole dish.

Chill for 45 minutes, then cut into squares and serve. 

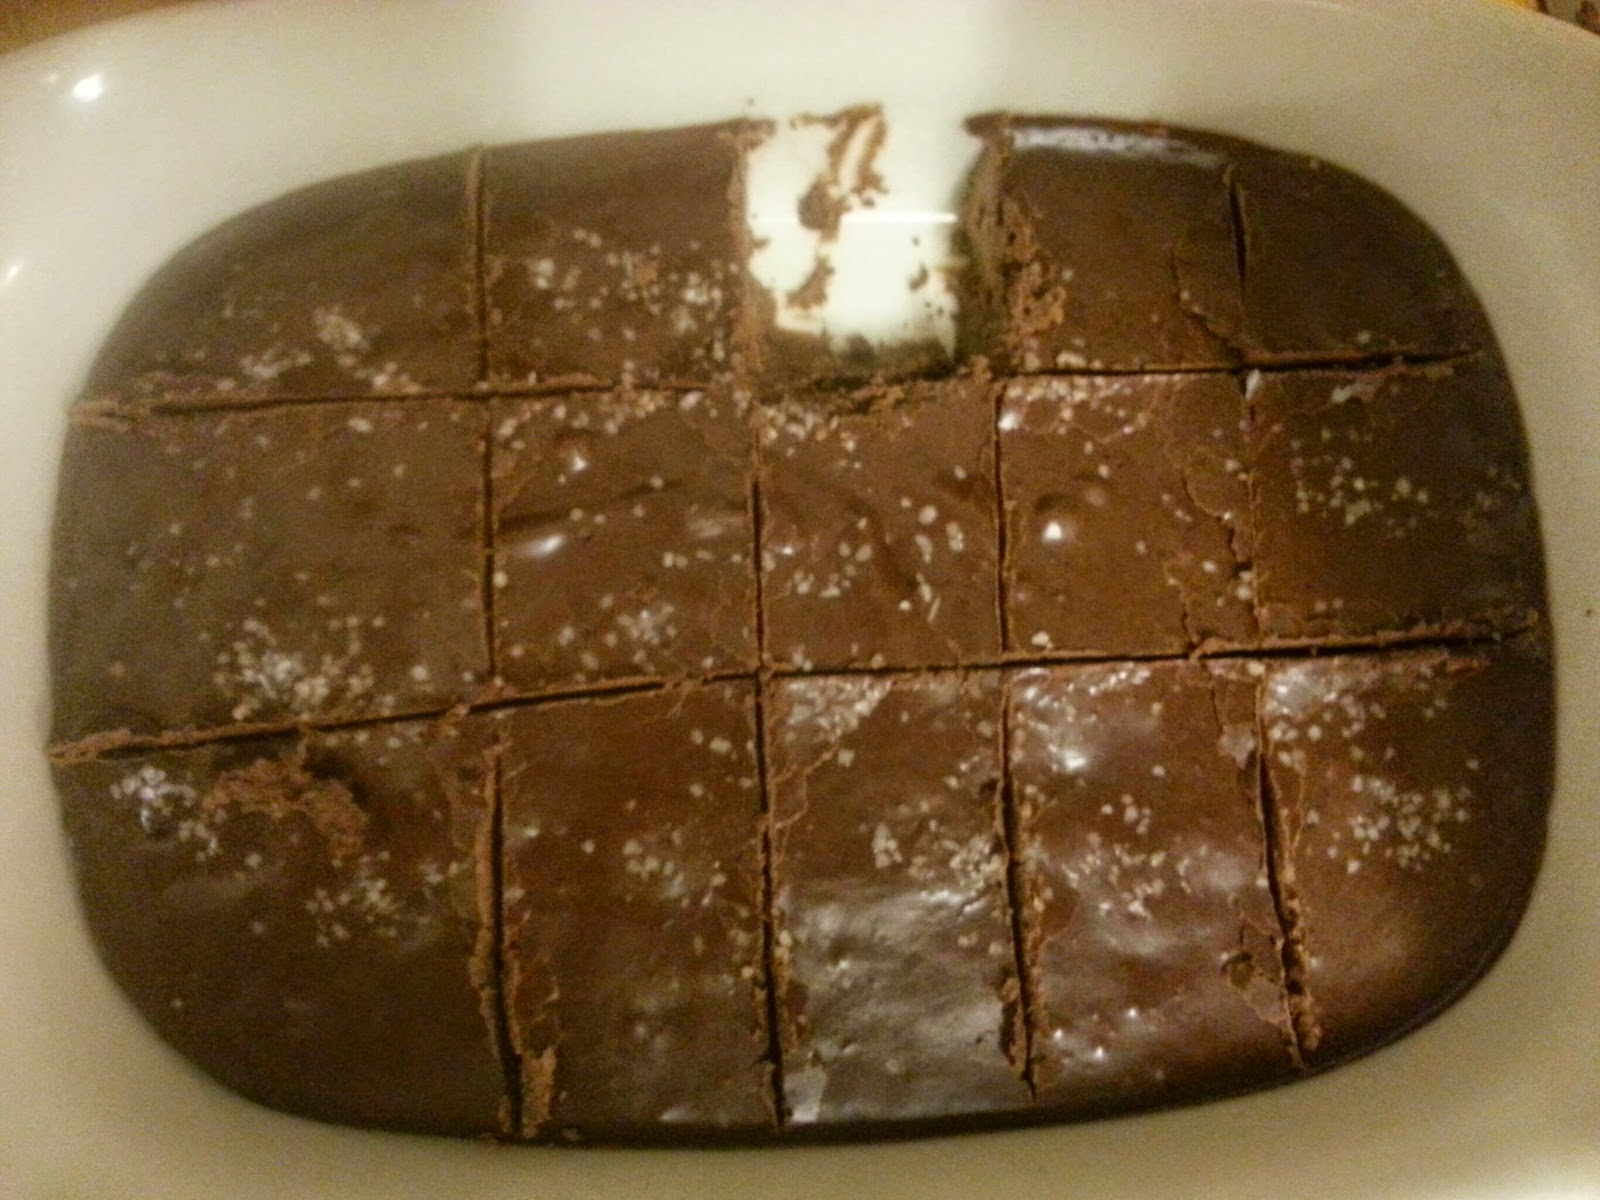
After cutting (don't mind my poor cutting job- my son helped me.  But hey, it tastes the same, right?)

Optional: I added a pinch of sea salt to the top of mine before chilling. A small amount goes a long way. It gave it a little extra flavor.  You could also add almonds or walnuts. 


They hould be chilled long enough so each square come out of the pan easily.  If the chocolate is too warm, the squares will be too gooey and will stick to the pan and fall apart.  

Find me on Facebook: https://www.facebook.com/bombshellmamarecipes

Monday, May 5, 2014

Classic New York Style Cheesecake with Graham Cracker Crust

This is a classic, tried and true recipe for New York Style Cheesecake.

Make sure to let it cool for at least six hours or longer.  Cheesecake is always better the next day!

Crust:
1 cup Graham Crackers, crushed
3 tbs sugar
3 tbs butter, melted
1 tsp salt (omit if you use salted butter)

Cheesecake:
24 ounces cream cheese (plain, full fat) at room temperature
3/4 cup sugar
1 tsp vanilla
1 tbs lemon juice
3 large eggs at room temperature

Preheat oven to 325 degrees.  (If using a dark nonstick pan, preheat to 300 degrees).

Crush the graham crackers completely.  I find the easiest way is to put them in my food processor an pulse until the crumbs are uniform size.

In a small bowl, mix together the crumbs, melted butter, sugar, and salt.  Spread the mixture into a 9 inch springform pan. press into the bottom of the pan and about 3/4 inch up the sides.  To make it even thickness, I use a drinking glass to press down on the crumbs.

Bake for 15 minutes.

In the meantime, beat the cream cheese and 3/4 cup sugar in a bowl.  Add the vanilla and lemon juice (I have substituted lemon zest and it is just as good) and beat until well incorporated.  Add eggs, one at a time while mixing.  Be sure to mix well after each egg.Pour the batter over the crust and bake for 1 hour 10 minutes.

Remove from the oven and cool to room temperature on the counter, then cool in the fridge for at least five more hours.  I swear, this cheesecake hits it's peak at 3 days old! Before removing the sides of the pan, go around the edges of the cake with a butter knife or small pastry spatula to prevent sticking.

My favorite way to eat cheesecake is with dark chocolate drizzle.  Sometimes I can be talked into berry preserves (I can my own, but if you on't have any, one cup of unsweetened frozen berries, 2 tbs water, and 1/2 cup sugar on the stovetop until boiling works.  Cool before garnishing).

Another fun variation is to mix 2 tbs Wildtree Very Berry Cheesecake Mix with 1 cup full fat sour cream.  10 minutes before the cheesecake is done, remove fro over spread the sour cream mixture over it, and bake the remaining 10 minutes.  It's a twist on the classic sour cream frosting.

Monday, February 17, 2014

Wildtree Greek Tzatziki Sauce

Busy Mama Recipes


Homemade tzatziki is the best. This recipe goes great with pita bread, bagels, carrot sticks, crackers, or on salads with chicken. It is simple to make and requires on a few ingredients so its perfect for get-togethers or for a snack.

1 cup full fat Greek yogurt or sour cream (or mix the two)
1 tbs Wildtree Dill Dip Blend
3 tbs grated cucumber
1 clove garlic, pressed
1 tsp Wildtree Lemon Pepper Blend

Mix all ingredients in a bowl and chill for an hour before serving.  Serve with pita chips, crackers, veggie trays, or put on wraps or sandwiches.

For a Middle Eastern twist, add basil or mint. Its great with cilantro on tacos, too!

Wildtree Dill Dip Blend- buy it here.

Sunday, February 16, 2014

Sturdy Buttercream Frosting (Great for Decorating)


Busy Mama Recipes


I know there are a million recipes out there for buttercream frosting, but I get asked for a recipe a lot. This one is my favorite because it tastes good and is still stiff enough to decorate and tends to not "melt". IT doesn't taste like sugar or food coloring, like a lot of decorating frosting tends to do.  It is not a traditional recipe, if that is what you are looking for. It does contain some cream cheese, but not enough to be called a cream cheese frosting.

I use my KitchenAid stand mixer and make large batches at a time. The recipe below yields enough frosting to frost and "stuff" a two layer cake, with leftover to make decoration flowers. Today I decorated three dozen cupcakes and had enough leftover to do almost a dozen more. The reason I don't like making small batches of frosting is because if the mixer isn't full, air gets whipped into the frosting and it creates bubbles... not good if you want smooth, decorating frosting.

3 cups salted butter at room temp
8 ounces room temp cream cheese (to stabilize and add flavor)
1 1/2 cups vegetable shortening (for stabilizing)
6 cups powdered sugar
2 tbs milk or heavy cream
2 tsp vanilla extract

Whip the butter, cream cheese and shortening until smooth. While continuing to mix, slowly add the powdered sugar. Add the milk (one spoonful at a time, and only if necessary) and the vanilla. Chill until you're ready to use.


Photo:  Monster cupcakes for my one year old son's monster themed birthday in February.  The frosting looked like this for a week before the rest of the cupcakes got eaten.  No melting, no running- even with the added food coloring.  I bought the candy eyeballs at Safeway.


Immediately prior to use, re whip in the mixer to prevent the frosting from becoming too hard to pipe.  The cream cheese and shortening are optional, and you can substitute butter instead. However, adding the shortening makes the frosting less "meltable". The cream cheese adds just enough flavor to make it not taste like butter, and also creates stability and helps keep it from melting or becoming soft.

Smoked Mozzarella and Tomato Stuffed Mushrooms

Busy Mama Recipes


I made this yummy "snack" today for a little family get-together and it ended up being gobbled so fast I wish I would have made more. If you like stuffed mushrooms, this is a must-try!

Photo from www.wildtree.com, where this recipe is featured. 

One package white mushrooms (about 30)
8 ounces cream cheese
2 tbs Wildtree Smoked Mozzarella and Tomato blend
2 green onions, sliced very thin
1/2 cup shredded Mozzarella or Parmesan cheese

Preheat oven to 350°F and coat a 9x13 baking dish with pan spray. Wash and de-stem all mushrooms. Arrange the mushroom caps, hollow-side up, in the baking dish. Chop half of the stems and discard the rest. In a medium mixing bowl, add one tablespoon of warm water to the Wildtree Smoked Mozzerella and Tomato Blend and mix until the water is absorbed. Add the cream cheese, chopped mushroom stems, and green onions.  Mix until thouroughly combined. Place cream cheese mixture into a zip-top bag and cut about half of an inch off of its corner. Squeeze the cream cheese mixture into mushroom caps until filled and top with shredded mozzarella. Bake for 30 minutes or until mushrooms are tender and cheese is browned.

Wildtree's Smoked Mozzarella and Tomato Blend.  Buy it here.


Serve with lemon wedges and easy marinara sauce:
Combine 14 ounces crushed tomatoes with a 1/2 tablespoon of Wildtree Hearty Spaghetti Blend. Warm on the stove or in the microwave.

Readers: This recipe is featured on the Wildtree Website now!  Check out their recipes, which you can sort by Wildtree Product.  

Sunday, December 1, 2013

Breakfast Casserole


Busy Mama Recipes


This casserole is so easy.  I put it together the night before and bake it in the morning to save time.  I have brunch with my parents every Sunday, and everyone always loves this.  The adults and kids eat it, and usually there are no leftovers.  I constantly get asked for this "Breakfast Lasagna" recipe:-)

It's pretty hard to mess up, and you can make it with anything you have.  My favorite is ham, which we had leftover from Thanksgiving, but you could make it with any meat.  Breakfast sausage is really good in it too.

In a 9x13 casserole dish, layer:

3 potatoes, shredded and tossed with 2 tbs Wildtree Smoky Bacon Flavor Grapeseed Oil***
1 cup cheddar cheese
2-3 cups cooked meat (cubed ham, bacon, or breakfast sausage works great)
1/2 white onion, diced
1/2 cup spinach or kale
3 Roma tomatoes, sliced thin
12 eggs whisked with 1/4 cup heavy cream and 1 tbs Wildtree Onion and Chive Blend
1 cup cheddar cheese for the top

*** I have used frozen tater tots- the kids love it!
Wildtree Onion and Chive Blend- buy it here.


Layer everything, in the order above, in the dish. bake at 375 for one hour, covered.  Uncover and bake for another 15 to brown the top.
Wildtree Smoky Bacon Flavor Grapeseed Oil- buy it here.

Sunday, November 24, 2013

Salted Caramel Mocha Scones

Holy crap.  I could eat these all day.  Salted Caramel anything is delicious but when you add chocolate it's a foodgasm.

I used dark, bittersweet chocolate (It is 80% cocoa and very lightly sweetened).  If you use a sweeter chocolate I would use less sugar or it may be a bit too sweet. You could also mix the two if you wanted.

Scones
2 cups unsifted, all purpose flour
1/3 cup sugar
6 tbs plus
1 tsp salt
1 tsp baking powder
2/3 cup plus 3 tbs heavy whipping cream, divided
1 cup dark chocolate chips

Preheat Oven to 425.

Mix the flour, sugar, salt, and baking powder until combined.  In a food processor, or in a large bowl using a pastry cutter, add the butter and pulse until it looks like crumbs.  Add 2/3 cup whipping cream and chocolate chips and mix until well combined.  

Roll dough onto a lightly floured surface and knead about 10 times.  Form the dough into a  1 inch thick circle and cut into eight pieces, like a pie.  

Arrange them on a baking sheet and brush with the remaining heavy cream.  Bake for 12-15 minutes or until the tops are golden brown.

Caramel Frosting
1 cup caramel (I used caramel squares from the grocery store, unsalted and not flavored.  I used about 14 squares but it will vary depending on the kid you use).
1 tbs unsalted butter

On a double boiler, melt the caramel squares with the butter.  Whisk constantly to prevent sticking.  When the scones are cool enough to handle but the caramel is still warm and not set, dip the tops of the scones in the caramel.  You could also spoon the mixture onto the scones, making sure to completely cover the top.  

Topping
3 tbs course sea salt
1 tsp sugar
3 tbs dark chocolate chunks, chopped very finely (Next time I'm going to grate it with my microplane zester so it's nore like chocolate shavings).

Sprinkle the salt mixture over the scones before the caramel completely cools. 

Raspberry White Chocolate Scones

Breakfast Win!

Mom Points!

These are so easy, too.  And a switch up from everything Cranberry and orange right now.  I'm making these Chrsitmas morning:-)

Ingredients
2 cups unsifted, all purpose flour
1/3 cup sugar
6 tbs plus 1 tbs unsalted butter, divided
1 tsp salt
1 tsp baking powder
2/3 cup plus 3 tbs heavy whipping cream, divided
1 cup plus 1/2 cup white chocolate chips, divided
1/2 cup fresh or frozen, unsweetened raspberries *See note below

Preheat Oven to 425.

If you are using fresh raspberries, wash them well and cut each in half.  If you use frozen, put them into a colander and wash with cold water, then run water over them until the juice below them runs clear.  then lay them out on paper towels and pat them dry.  Set them aside.  If you skip this process, the scones will turn pink and may be too juicy, so they won't have the right consistency. 

Mix the flour, sugar, salt, and baking powder until combined.  In a food processor, or in a large bowl using a pastry cutter, add 6 tablespoons of butter and pulse until it looks like crumbs.  Add 2/3 cup whipping cream and 1 cup of white chocolate chips and mix until well combined.  Add the raspberries last and mix as little as possible.  If you were using a food processor, I would transfer the dough to a bowl and mix with a spoon to prevent the berries from falling apart. 

Roll dough onto a lightly floured surface and knead about 10 times.  Form the dough into a  1 inch thick circle and cut into eight pieces, like a pie.  

Arrange them on a baking sheet and brush with the remaining heavy cream.  Bake for 12-15 minutes or until the tops are golden brown.

In the meantime, on a double boiler, melt the remaining white chocolate with the remaining butter.  Whisk constantly to prevent sticking.  Drizzle over the scones after they are out of the oven.

Enjoy! 

Saturday, November 23, 2013

Lemon (Not-Meringue) Pie with Cardamom and Chocolate

When I was growing up, my grandfather's favorite pie was lemon meringue. I love lemon. Loooove it. But I don't not love meringue. Bleh. I wish I did- I try to like it. I eat it and I always think I will like it, but in the end its just whipped egg whites like usual. This pie is a little different from the typical lemon pie, so its a fun one to bring to a pot luck or holiday dinner.

Crust:

2 1/2 cup graham crackers, crushed
1/2 tsp salt
4 tbs unsalted butter, melted
2 tbs brown sugar

Combine all ingredients in a bowl and mix well. Press into a pie pan, making sure to cover the bottom and the sides. Bake for 15 minutes on 375. Take out to cool. Turn the oven down to 325.

Filling:
Juice of two large lemons (make sure to keep the zest)
14oz sweetened condensed milk
4 egg yolks
2 tbs all purpose flour
1/2 tsp cardamom
2 tbs sugar

Whisk together all ingredients in a large mixing bowl. Pour into the pie crust and bake for 20 minutes. Take it out of the oven and let it cool completely. I would let it sit in the fridge for at least an hour before moving on to the next step.

Not Meringue:
2 cups heavy whipping cream
Zest of two lemons
4 tbs powdered sugar
1 tsp vanilla extract
1/2 tsp cinnamon

Whisk the heavy cream until firm peaks form. Slowly add the sugar and lemon zest. Then slowly add the rest of the ingredients. Pipe decoratively or spread onto the completely cooled pie.

Garnish with dark chocolate shavings or sauce and serve.

Wednesday, November 20, 2013

Fall Fruit Salad

Fruit salad is a must have at most pot lucks, and after you have tasted one, you've tasted most.  They can get kind of boring unless you spice it up with something fun.  This fruit salad would be great at Thanksgiving or Christmas dinner.

To serve 6, I used:
2 Honeycrisp Apples, diced
2 pears, diced
3 Clementine oranges, their slices cut into small pieces
1 mango, diced
1 pomegranate, just the seeds 
sliced almonds for the top

Dressing:
Zest and juice of a lemon
2 tbs honey

Whisk together the honey and lemon in a bowl and toss with the salad to coat, then top with the almonds.  If you don't have access to fresh pomegranate, you could use Craisins instead (some stores have a pomegranate flavor).

Saturday, November 16, 2013

Cranberry Orange Mini Scones with a Creamy Ginger Glaze


Busy Mama Recipes


Every Sunday I have brunch with my family, and tomorrow it's my turn to host. I made a practice run with a recipe today and loved it. Knox has deemed them "the most yummy cookie", so I think they'll be acceptable at tomorrow's get together.  Plus, the combination of cranberry, nutmeg, orange, and ginger are perfect for this time of year. 

Scones
2 cups ap flour, unsifted
1/4 cup sugar
2 tbs brown sugar
1 tsp salt (omit if you use salted butter)
1 tsp baking powder
6 tablespoons butter
1 pinch nutmeg
2/3 cup heavy whipping cream plus 2 tablespoons for brushing
Zest of one orange * Learn how to zest an orange without making the recipe bitter
1 cup Craisins (or dried, lightly sweetened cranberries)

Preheat Oven to 425.

In a food processor, combine the flour, sugars, nutmeg, salt, and baking powder and pulse a couple of times. Add the orange zest and butter and pulse until it looks like small crumbs. Then add the cream and mix until it is well incorporated.

Next, on a lightly floured surface, dump out the crumbly dough. Add the berries and knead with your hands until its very well mixed ( about one minute). Divide the dough in half, and form each half into a one inch thick circle, then cut into eight pieces (like a tiny pie).

Arrange them on the baking sheet and paint with the remaining heavy cream.
Bake for about 12 minutes, or until they're golden brown on top. After they cool, spoon the glaze (recipe below) evenly over each one. Make sure to refrigerate the leftovers (if there are any;-))

Creamy Ginger Glaze
1 tbs orange juice (fresh squeezed from the orange you zested earlier)
1 tbs heavy cream
1/2 tbs ground ginger
2 cups confectioners sugar

Whisk together in a small bowl until smooth.  This glaze should be very thick.  Since it contains milk it should be refrigerated if not eaten.

Creamy Chicken Artichoke White Lasagna


Sometimes I feel like I need to learn to cook worse so I won't eat so much. Then I change my mind because I love food almost as much as I love making it.
I roasted a chicken earlier this week and needed to use the leftover meat for something. I am really red-sauced out right now, so I was trying to think of something without the Bolognese type sauce. Oh, and it needed to have artichoke in it.

Ta-da. I'm a genius:-) Chicken lasagna with artichokes; something my kids would hopefully eat if I told them it was chicken and cheese. And it sounded easy enough.


Ingredients
Shredded chicken, approx 2-3 cups (I just pulled the meat off the carcass and chopped it. I used closer to 2 cups since my three year old son ate a bunch of this chicken during the prep:-) But any amount would work, really).
2 cups full fat Greek Yogurt (none of that nonfat crap- that isn't yogurt)
2 cups cottage cheese or ricotta cheese
1 1/2 cups shredded mozzarella cheese, divided
1/2 cup grated Parmesan or Romano cheese
1 can (14 ounces) artichoke hearts, drained and chopped
1 small white onion, chopped
1 cup spinach, chard, or kale, chopped
1/4 cup chopped parsley
3 garlic cloves, minced
2 Roma tomatoes, thinly sliced in circles
Juice and zest of one lemon
1 box of lasagna noodles (prepared like the box says) *** You can also use zucchini noodles and make a grain free/ gluten free lasagna
Bechemel Sauce: Melt 2 tbs of butter in a saucepan.  Add 2 tbs of flour and whick together, cooking on medium for about five minutes.  Add 2 cups of milk and whisk together.  Add 2 cloves of minced garlic.  Add 1/2 tsp of nutmeg, 1/2 tsp of paprika, and salt and pepper to taste.  Simmer, whisking often, until hot.  Be careful not to burn. It should thicken as it cools. 

Directions
Preheat oven to 365.

In a large mixing bowl (I used my KitchenAid mixer) I combined the yogurt, chicken, artichokes, 1 garlic clove, onion, and 1/2 cup of mozz cheese.

In my food processor, I combined two cloves of garlic, parsley, lemon zest and juice, and cottage cheese. I pulsed it until it was smooth and looked like green cream cheese. I added some black pepper for flavor. 

*** The cottage cheese is a great alternative to ricotta because of the protein and the lower calorie and fat content. You could use ricotta instead and it would still taste great. 

This is what the cottage cheese mixture looks like when it's done.  Slightly green with no lumps.

In a large casserole dish (mine is 9x13), I layered like this:
Noodles
Chicken mixture
Spinach
Noodles
Cottage cheese mixture
Layer of tomato slices
1/2 cup mozz cheese
Noodles
Bechemel Sauce
The rest of the mozz cheese
Layer of tomato slices
Parmesan cheese (I garnished with ground pepper and oregano flakes)

Bake, covered for 30 minutes. Remove the cover and bake for another thirty minutes.

And I was right, my kids scarfed this down!

Sunday, November 3, 2013

Cranberry Vinaigrette

Holy yum.

If you're a regular reader, you know how much I love salad dressing. Obviously- I have like 15 recipes on here for different dressings. You'd think I'd be super thin since I eat so much salad, but no. These drwssing are for real... no the stupid, "diet" kind. Sick.

We had our first snow here today, so with that mood I decided to make something holiday-ish. Perfect timing since its the beginning of November, marking the time when people prepare for Thanksgiving.

This was an interesting creation for me, and I'm probably still going to improve on it as time goes by and the voices give me more ideas. Keep in mind this is just a prelim, but its still pretty delicious. I would drink it if it was socially accepatable. I promise I'm dipping bread in it as I type. :-)

1 cup fresh cranberries
1 cup + 3 tbs brown sugar
3 tbs balsamic vinegar (or mix with rice vinegar)
3 tbs molasses (you could also use honey or real maple syrup)
1 tsp oregano
1 tsp thyme
1 tsp ground pepper (I subbed three pink peppercorns)
1 1/2 cups canola, vegetable, or grapeseed oil (I used a combo of gso and canola)

Blend all of the ingredients, except oil, in a food processor until smooth. Once combined, add oil very slowly with the food processor on high (immulsify). Store in a sealed container in the fridge for up to ten days (mine never lasts that long ;-) ). I usually use a glass mason jar with a lid.

If the cranberries are hard, microwave for one minute in a bowl. You will hear them "pop", and that's normal.

This is great on any salad, but I prefer it with baby spinach, craisins, slivered almonds, onions, and either pears or apples topped with crumbled goat cheese.

Enjoy:-)

Thursday, September 12, 2013

Classic Crockpot Chili

It's almost that time of year:-) I freaking love Fall- Its the best. I love cockpot meals, and I love that my kids eat them. Chili is one if the easiest to prepare and easiest to make healthy. My kiddos eat it plain, on hot dogs (gross), or (duh) with Fritos. One if them loves ketchup on chili (seriously... so gross), and one loves it on baked potato (even though he doesn't like potatoes)... hmm... boys are wierd. But whatever, cook it like this, and your family can wreck it however they'd like;-)

1 pound ground beef, cooked and drained (turkey can be used too)
5 cans of beans (I mix light and dark kidney beans with black beans)
1 quart diced tomatoes in juice
1-2 quart stock (chicken or vegetable)
1 large onion
2 cans diced green chilis
2 jalapenos, seeded and diced
1 green bell pepper, diced
1 bunch cilantro, leaves only, chopped (or 2 tbs dried)
Juice and zest of one lime
2 tbs cumin*
1 tbs chili powder*
Hot sauce (optional)
Salt and pepper

After browning and draining the hamburger, place all ingredients in the crockpot and cook on low for 4-5 hours.

Garnish with chopped green onions, sour cream, and shredded cheese. Or, if you are like my children, garnish with a bag of Fritos and some ketchup:-)

Leftover idea: drain all the juice and roll the filling in tortillas. Cover in enchilada sauce and bake for 35 mins on 350 for some quick, home made enchiladas.

Omit the meat and use veggie stock for a vegan option. Conveniently, this dish is also gluten, dairy, egg, and nut free:-)

*You can sub taco seasoning for these spices

Saturday, September 7, 2013

Crockpot Potato Soup

This is the perfect soup for Fall. The kids love it because its "yummy" and I love it because its easy and inexpensive. Plus, crockpots are great because you only have one dish to clean when you're done:-)

You'll need:
7-10 potatoes, washed and diced (I like Yukon Golds and reds mixed, but any kind will do). In the end it will be about 8 cups.
2 onions, diced
4 celery stalks, diced
2 leeks, sliced very thin (or use 2 bunches green onions)
1 quart stalk (chicken or vegetable- homemade is best)
1 cup heavy cream
Salt and pepper

Put all ingredients except the cream in the crockpot and cook on low for 4-5 hours. Add cream for the last 30 minutes.

We serve our with bacon pieces on top and steamed broccoli or green beans on the side.

Crockpot Mediterranean Chicken

This recipe is a classic. You really can't mess it up. Inliterally make it different every single time I prepare it, and its always turned out great. It's the perfect lighter dish for fall.

4 boneless, skinless chicken breasts, sliced
1 quart diced tomatoes in juice
3 zucchini, sliced very thick (or sub eggplant)
1 onion, diced
1 fennel bulb, finely diced
3 cloves garlic, minced
2 red bell peppers, sliced
8-12 Brussels sprouts, cut in half
8-12 green olives, cut in half
1 cup chopped fresh spinach or swiss chard without the stem
1 tbs oregano
1 tbs parsley
1 tbs dill
Lemon juice
3 tbs caper berries
Salt and pepper to taste
Spaghetti noodles (spghetti squash can be used for a lighter version)

Place all ingredients except noodles in crockpot and cook on low for 5-7 hours. Serve over noodles or spaghetti squash and garnish with feta cheese and a lemon wedge. I like ours with a cucumber salad.